The following steps assume that you have a functional installation of WordPress active on your site. If this is not the case, follow these instructions for installing WordPress before proceeding.
Step 1 – Grab Your Backup Files
We advise that you perform a full backup every week, and a database backup every day. We also strongly suggest that you export your downloads to one of the five external locations/methods that ManageWP offers – Amazon S3, Dropbox, Google Drive, FTP, or email. If your backups aren’t external and your entire site gets wiped, the backups will disappear along with the rest of your data.
When it comes to restoring a site, the first thing you need to do is get your hands on the files and folders that you will be restoring. If you have set up regular scheduled backups with ManageWP, doing so is a piece of cake.
In your ManageWP dashboard, click on “Backups” in the top navigation menu under “Protect”, then “View Backups” under the relevant backup schedule. You will then be presented with a list of backups for you to choose from. Download the ZIP file you need to a convenient location on your PC.
Step 2 – Upload Your Database
Your site’s database includes all of the vital raw data for your site – posts, pages, comments, settings, and so on. It is almost definitely the most important part of your site. Getting it back up and running should be your first priority.
In order to do so, you will need to access phpMyAdmin, which is something that should be available on your hosting provider’s control panel. If it is not, contact your host for information on how to access phpMyAdmin.
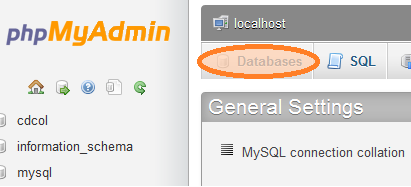
Once you have logged in, you need to ascertain whether or not your database is intact. Click on “Databases” (please note, the follow screenshots may not look the same on your system, but they should be similar):

If your database no longer exists, you will not find it listed. In such cases, you need to create one (this option should be right in front of you).
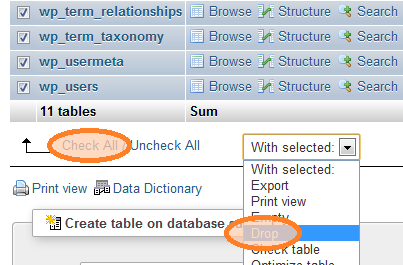
If your database does still exist, you need to click on it and “Drop” all of the remaining tables within:

Once you have confirmed the “Drop” of your tables, you will be left with a shell into which you can insert your unscathed backup database file.
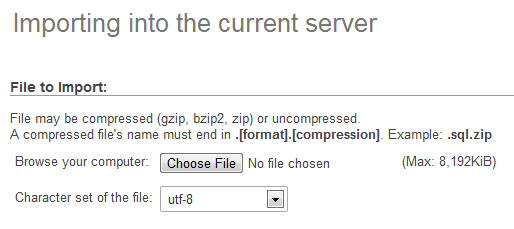
Next, click the “Import” option in the navigation bar at the top of your screen. Remember the backup file you unzipped earlier? Go back to that, and find a folder within named “mwp_db”. You will find your backup database file inside, which you can upload on the Import screen.

As you can see from the above screenshot, there is a size restriction on the file. If your database file is larger than 9mb, you can compress it in order to bring it under the limit.
That’s it! If you attempt to access your site now, you should find that the content of your site has been restored. But your themes, plugins and media will all still be missing. So what next?
Step 3 – Upload Files To Your Site Via FTP
Your database is the only “sensitive” data that needs to be properly uploaded and installed via phpMyAdmin. All other data can simply be uploaded via FTP. However, you will of course need to make sure that you upload the files and folders to the correct location.
Login to your website via your FTP client and navigate to the root directory. Your backup folder will contain a comprehensive list of files and folders. Depending upon the state of your site, you will need to upload either some or all of them. If you are in any doubt, it is easier to simply copy the full contents of the folder, and overwrite files as and when it is necessary. If you feel uneasy about doing so, feel free to take a backup first. If your site has been completely wiped, you will need to transfer the entire backup folder via FTP.
That’s It!
Your site should now be restored to its former functioning self. Although the process is certainly more cumbersome than ManageWP’s WordPress website backup/restore tool, this method is useful to have to hand as a last resort.
Post From Managewp


